
It’s been a while since WordPress launched its most awaited Gutenberg update. This update comes with the all-new Block editor that brings block-based editing replacing the old TinyMCE editor.
The Block editor has opened its gates to an all-new approach of creating content. The block-based functionality also allowed developers to build their own blocks which resulted in some awesome blocks plugins.
But, for those who are having a hard time using this new editor, I have put together some time-saving tips and tricks.
These 10 WordPress Block Editor tips and tricks will help you get productive and use the platform more efficiently.
Let’s get started.
- 1. Copy/Paste from Anywhere (Google Docs, Microsoft, etc)
- 2. Use Slash (/) To Add A New Block
- 3. Use Drag & Drop To Rearrange The Blocks
- 4. Add Images By Dragging Them From Your Desktop
- 5. Add Links By Just Pasting Them
- 6. Create Anchor Links by Using HTML Achor
- 7. Learn Gutenberg Keyboard Shortcuts
- 8. Create Reusable Blocks To Use Later
- 9. Transform Blocks Into Different Blocks
- 10. Hide The Sidebar For Full-Screen Editing
- 11. Jump Around Your Post’s Sections From Document Outline
- 12. Copy All Content With A Click
- 13. Use Ultimate Blocks To Get Access More Blocks
These Gutenberg tips and tricks are for everyone using Gutenberg. Whether you’re a novice user or someone experienced, these tips and tricks will help you a lot.
1. Copy/Paste from Anywhere (Google Docs, Microsoft, etc)
This is my favorite feature of the Block editor.
If you’re some who writes content on Google Docs or Microsoft Word, you can directly copy and paste it to the Gutenberg editor.
Including images!
The classic editor of WordPress didn’t have this feature and it was a very time-consuming process to copy the content and then upload the images.
With Gutenberg, you don’t have to worry about any of that.
Just write your content in Google Docs or Microsoft Word and then paste it directly.
2. Use Slash (/) To Add A New Block
Since Gutenberg is a block-based editor, you’ll have to add anything in the form of block. And Gutenberg comes with many blocks.
Finding and adding blocks can be a time-consuming process sometimes. Not to mention, if you have Gutenberg block plugins installed, this task gets even difficult.
Instead of finding and adding blocks, you can simply type ‘/’ and type the name of the block you want to add.
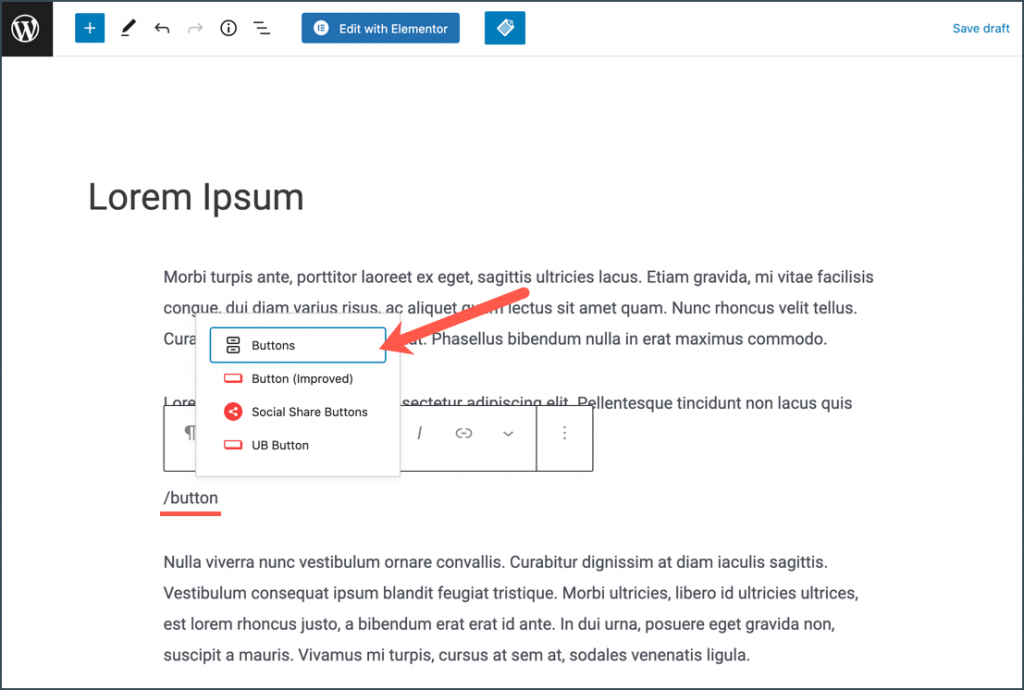
What’s even better is that Gutenberg gives auto-suggestions so that you don’t have to type in the full name of the block.
This will save you from finding the block you want and help be more productive.
There are many Block Editor shortcuts but I think this is the one you should start using right away. And saves a lot of time.
Also Read: How to Add A Block In WordPress (3 Easy Ways)
3. Use Drag & Drop To Rearrange The Blocks
Since Gutenberg is a drag-and-drop WordPress editor, it’s obvious that you should be able to drag and drop blocks to arrange.
In the old classic editor, to rearrange content, you’d have to copy the entire text and paste it to the new location. This is very time-consuming especially when you want to move non-text blocks such as buttons, images, and galleries.
With Gutenberg, you can easily rearrange blocks by simply dragging them and dropping them to the new place.
To drag and drop blocks, you first need to select the block you wish to rearrange. Once the block is selected, you’ll see six small dots in the left toolbar.
Hover over the block and grab them to drag the block. This way, you can grab the block and move it anywhere on the page.
Also Read: How to Move Blocks In WordPress (3 Easy Ways)
4. Add Images By Dragging Them From Your Desktop
One of the worst things about WordPress’s classic editor was how images were added.
To add an image you will have to add a media and then upload it. Even if you dragged and drop the image, it wouldn’t be uploaded instantly.
With Gutenberg in the picture, now you can simply drag images from your desktop and add them to your content.
And, this feature is not limited to your computer. You can copy and paste images from the Internet easily.
The image gets uploaded without requiring any confirmation or additional steps.
Also Read: How to Add Images in WordPress
5. Add Links By Just Pasting Them
Pasting links is another awesome feature in Gutenberg.
You can copy and paste the link in your editor and Gutenberg will automatically paste it into a new block.
It will also automatically detect the URL and convert the link into viewable content.
This is helpful in cases where you have to add multiple links to your content. It will save you time and help you get things done faster.
6. Create Anchor Links by Using HTML Achor
Anchor links let you navigate to a specific part of a page easily. They are also called jump links and are most commonly used for the table of contents.
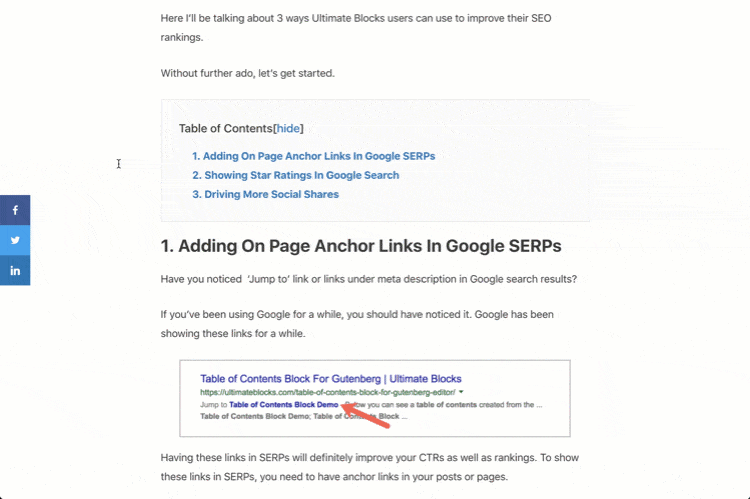
In Gutenberg, you can easily create an anchor link using an HTML anchor. An HTML anchor basically allows you to link to any section of a page.
Let us see how to create anchor links in Gutenberg:
Click on the header block and go to the “Advanced” tab. In this tab, you’ll see an “HTML anchor” field. Give a name to your anchor field.
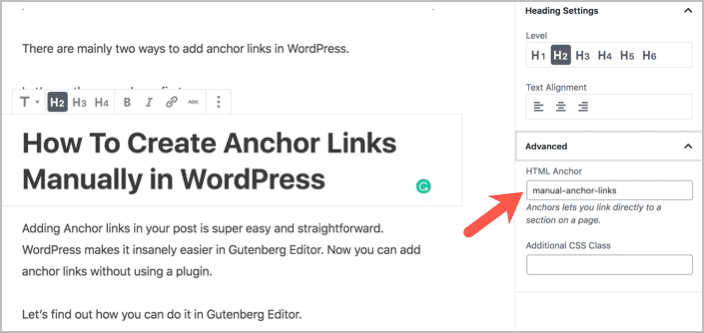
Now, select the text where you want to link the anchor. Insert the anchor name you gave to your section. Make sure to add a “#” before the link text.
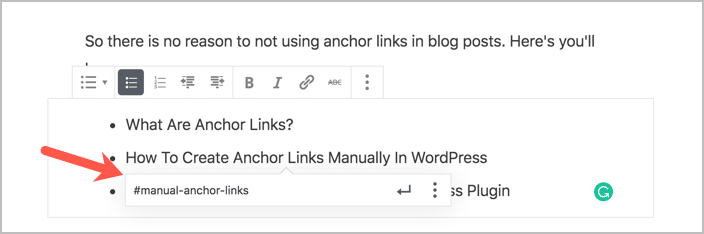
That’s how simple it is to add an anchor link in Gutenberg. Anchor links can be very useful when you want the user to navigate through different sections on a page.
7. Learn Gutenberg Keyboard Shortcuts
Slash (/) is just one useful keyboard shortcut in Gutenberg. There are many more you should start using right away.
While there are the general WordPress editor shortcuts that have been there for a long time. WordPress introduced some new dedicated shortcuts for the Gutenberg editor.
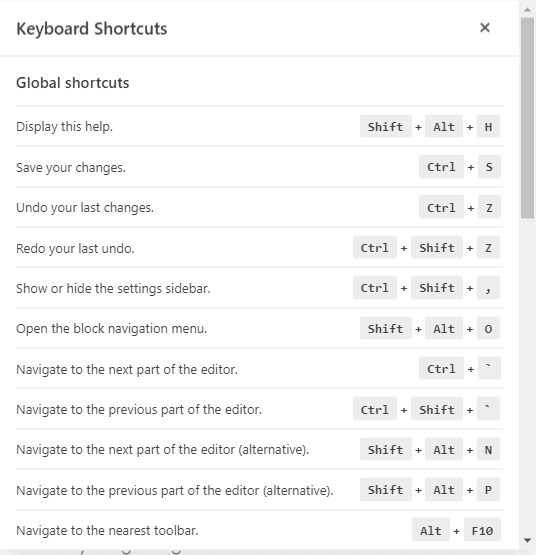
You can view the list of keyboard shortcuts by pressing Shift + Alt + H.
There are many great and easy to remember shortcuts for Gutenberg. Some of them are:
- Switch between Visual Editor and Code Editor: Ctrl + Shift + Alt + M
- Delete a block: Ctrl + Alt + Backspace
- Duplicate a block: Ctrl + Shift + D
- To create a heading: ##
- To create a quote: >
There are many shortcuts in Gutenberg and you should start getting a hand of them one by one.
8. Create Reusable Blocks To Use Later
Reusable blocks are blocks that you can save and use on other pages as well. You should utilize this feature in instances where you have to use the same block on different pages.
Examples of reusable blocks can include a CTA, quote, or a button.
The reusable blocks are saved as a template in Gutenberg. To save a block as a template, click on the three dots on the block and then select ‘Add to Reusable Blocks’.
You can give a name to your reusable block and then save.
Once your reusable block is saved, you can insert it to your pages just like any other block.
Gutenberg also lets you manage all the blocks and import or export them as JSON files. You can also delete your reusable blocks.
9. Transform Blocks Into Different Blocks
Added a text that you want to convert it into a heading, quote, or a list?
Instead of deleting and creating a new block, you can transform your existing block to other forms.
To transform a block, click on the transform icon. It will give you options to choose from. Select your desired transformation and your block will be converted to the new form.
I have found this very helpful when I wanted to convert my text into headings. You can use this Gutenberg trick any time to save your time.
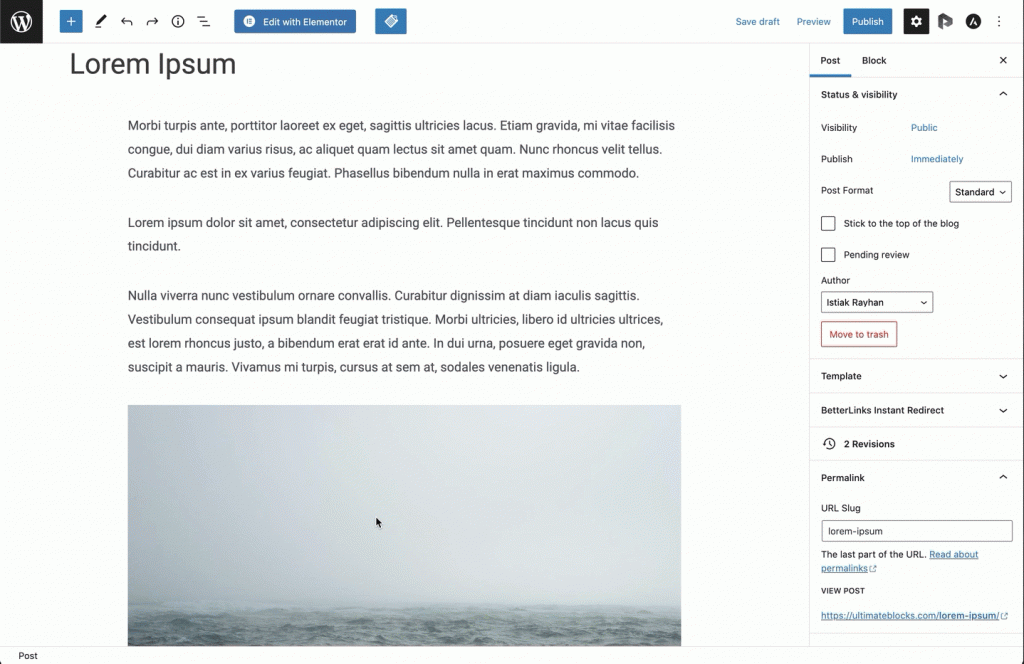
10. Hide The Sidebar For Full-Screen Editing
Want a distraction-free environment for writing?
You can turn on the full-screen editing mode for a more focused and productive experience.
Full-screen mode in Gutenberg hides the left sidebar to give more real estate to the editor and to eliminate distractions.
You can enable this mode by clicking on the dots at the top right corner. There, you’ll see an option to enable full-screen editing.
11. Jump Around Your Post’s Sections From Document Outline
Previously, the classic editor of WordPress didn’t have any great features to help you view the document outline or any other information.
With Gutenberg, WordPress introduced the ‘Content Structure’ feature. This feature displays the entire document outline along with the number of words, headings, paragraphs, and blocks.
You can view the content structure by clicking on the information icon.
What’s great about this feature is that it lets you jump around different sections of your post by clicking on any part of the outline.
This quite a useful feature for pages with a lot of content. Instead of scrolling your way down to a section, simply click on the content structure and jump to your desired section.
12. Copy All Content With A Click
How do you copy blocks in Gutenberg? Well, it’s very simple.
Click on the ellipses icon at the top right to open more tools and options menu. Under the ‘Tools’ section, there is an option “Copy All Content”.
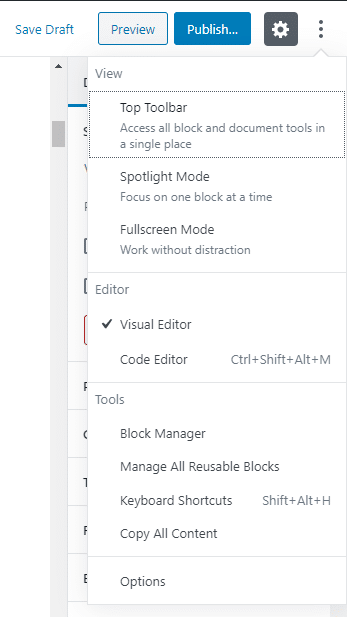
This option will automatically copy all content on your page. You can then paste all the copied content on any other page.
Alternatively, you can also use the keyboard shortcut Ctrl+A to select all content and Ctrl+C to copy it.
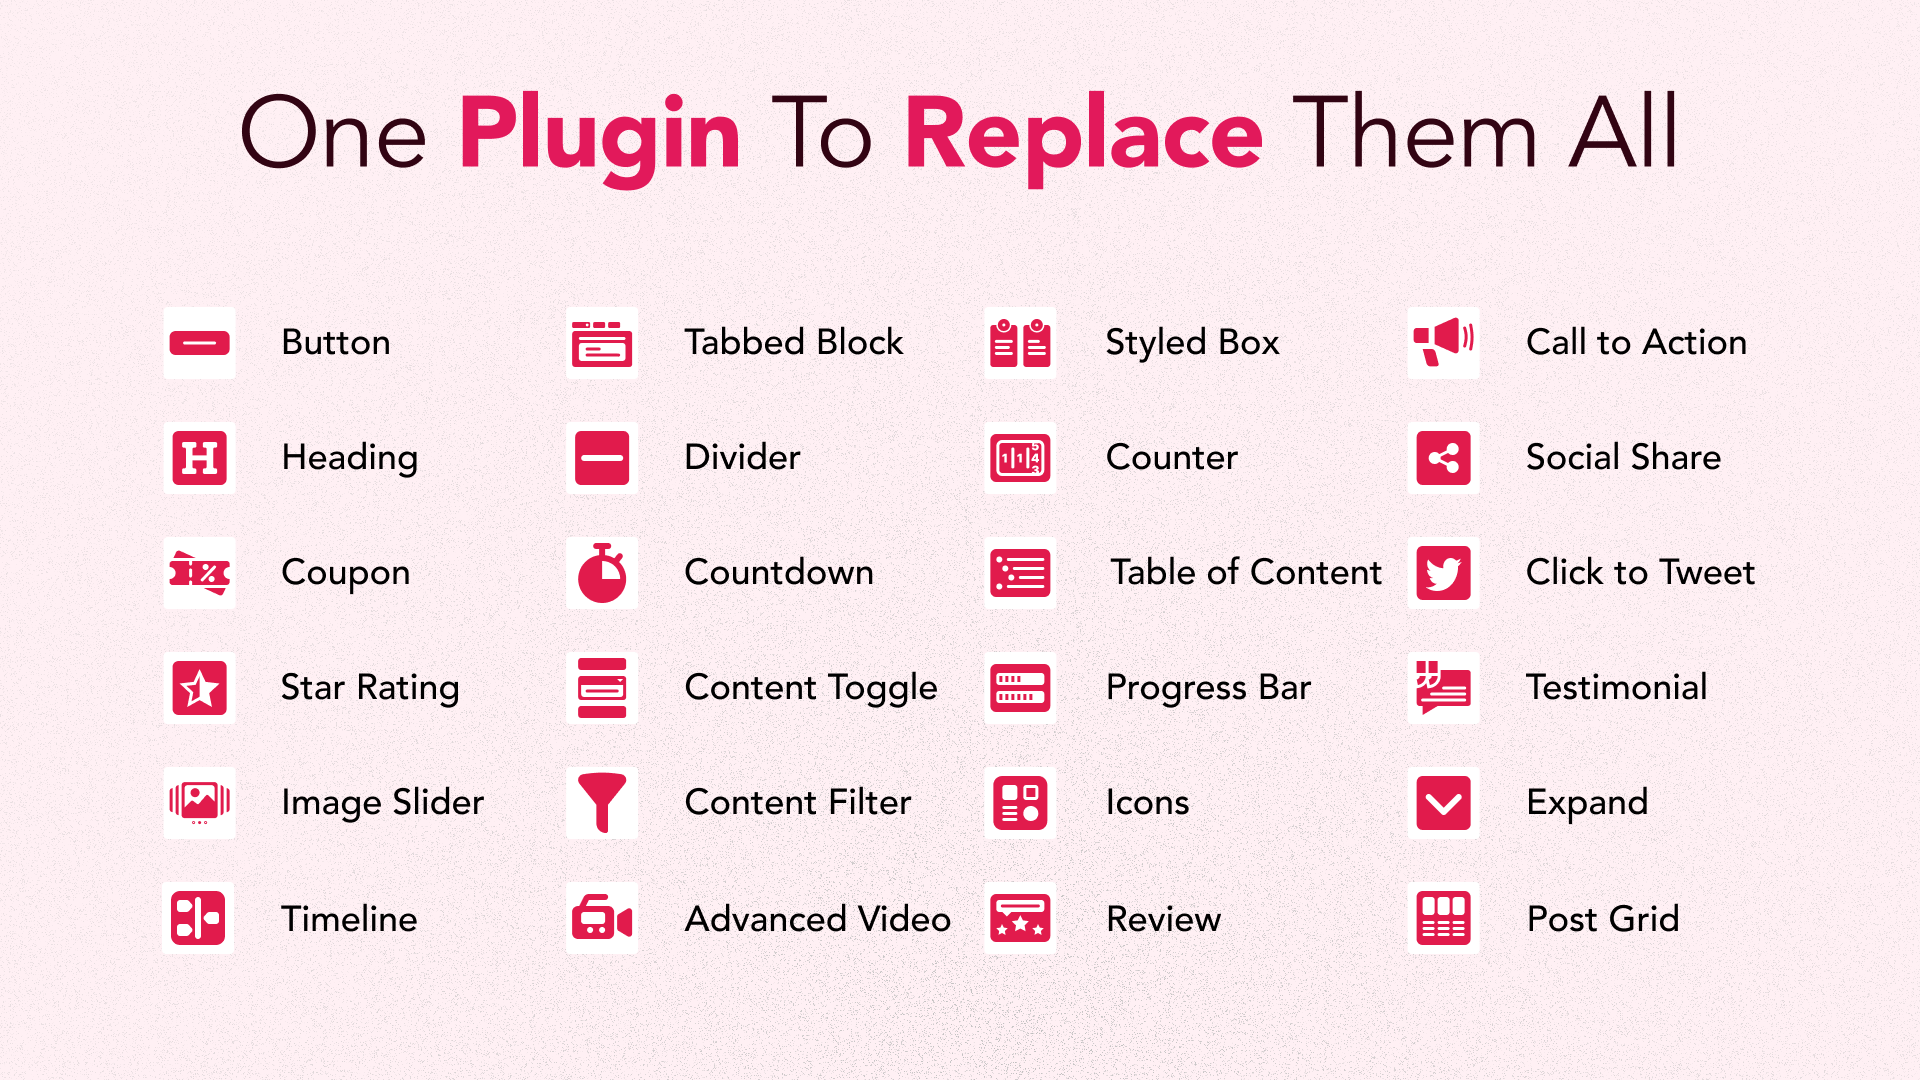
13. Use Ultimate Blocks To Get Access More Blocks
Gutenberg is really a powerful tool. But what makes it even more powerful is that you can install third-party plugins to extend the functionality of this editor.
One such plugin that will help you do more is Ultimate Blocks.
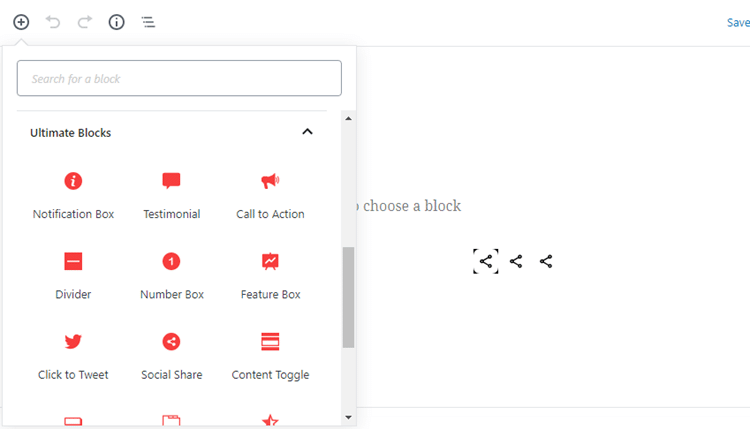
Ultimate Blocks is a Gutenberg blocks plugin developed by us. This plugin comes with some really awesome blocks that you can use in your content.
While many other Gutenberg plugins add fancy blocks that can’t be used everywhere, Ultimate Blocks comes with 18 blocks focused around content.
Some of the blocks that come with the plugin are:
- Content Filter
- Review (Schema Enabled)
- Table of Contents
- Tabbed Content
- Content Toggle (Accordion)
- Image Slider
- Click to Tweet and more.
We are working very hard on adding new blocks to our plugin. This plugin will help you elevate your content and be more productive with Gutenberg.
Conclusion
So, these were the 10 time-saving Gutenberg tips and tricks you should definitely use. There are many ways you can use Gutenberg to increase your productivity.
These 10 are my favourite tips and have helped me use Gutenberg in a productive way.
What are your favourite Gutenberg tips and tricks?
Share with us in the comments section below.
Leave a Reply