Do you want to add progress bars to your WordPress posts and pages? You’ve come to the right place!
Progress bars are an engaging and helpful way to display abilities, skills, or progress. Whether you want to showcase your skills on a portfolio or highlight features on a landing page, you can easily add progress bars in WordPress.
In this article, I’ll show you how to add progress bars in WordPress in just a few simple steps. You’ll learn how to add progress bars, with and without using a plugin.
That being said, let’s jump straight into it.
Adding Progress Bars Without Using a Plugin
If you prefer not to use plugins, we’ll show you how to use a pre-designed WordPress pattern to add progress bars. Just follow these simple steps:
Step 1: Access the Progress Bars Pattern
Open your web browser and go to the Skill Progress Bars Pattern page.
Step 2: Copy the Pattern
On the pattern page, click the Copy Pattern button to copy the pattern code to your clipboard.

Step 3: Add the Pattern to Your Post or Page
Now, go to the post/page where you want to add the progress bars. Once you’re in the Block Editor, click on the + icon and insert the Paragraph block. Then simply paste the copied pattern code there.
Note: The progress bars look thick in the editor, but it looks thin and right in the preview.
Step 4: Customize the Progress Bars
Click on the any element that you want to edit and customize it from the right-hand side options panel.
That’s it. You’re done. Your progress bars are ready.
Adding Progress Bars Using a Plugin
There are several progress bar WordPress plugins that let you add progress bars in WordPress. Here we will be using the Ultimate Blocks plugin. The ‘Progress Bar‘ block by Ultimate Blocks offers both horizontal and circle progress bars.
Let’s see how to use it.
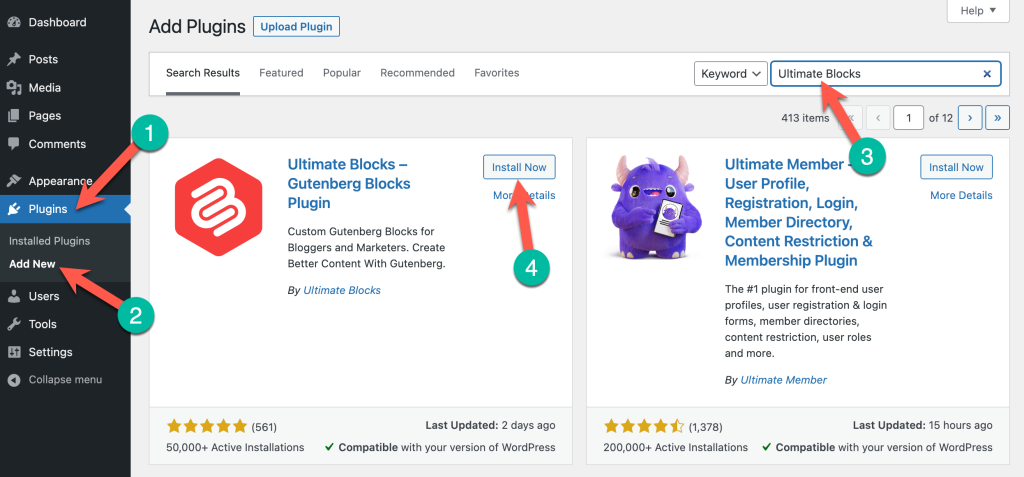
Step 1: Install the Ultimate Blocks Plugin
Go to your WordPress Dashboard > Plugins (1) and click on Add New plugin (2). Search for the Ultimate Blocks plugin (3) and install and activate it on your website (4).
Step 2: Insert the Progress Bar Block
Now go to the page/post where you want to insert the progress bar. On this page, click on the + sign and search for the Progress Bar block. And click on the block.

Step 3: Customize the Progress Bar
Once the progress bar block is added, you can edit and customize it according to your needs. First, add a description to your progress bar (1) and set the value of the bar (2).

You can find customization options in block settings where you can change the bar thickness, and progress bar value, change the progress bar type (horizontal or circular), and customize the bar colors.

Step 4: Add More Progress Bars
This way, you can add multiple progress bars in WordPress using the Ultimate Blocks plugin.

As you can see, adding a progress bar in WordPress is very quick and easy. The Ultimate Blocks plugin is very easy to use and its progress bar block comes with all the features you’d need.
Moreover, you can find even more useful blocks on Ultimate Blocks such as buttons, countdown timers, testimonials, toggles, and more.
Conclusion
So, that’s how you can add a progress bar in WordPress using the Ultimate Blocks plugin. This can be done using CSS as well but I recommend using a plugin as it’s easier to manage and customize.
If you have any questions regarding this tutorial or the Ultimate Blocks plugin, feel free to drop your questions in the comments section below. I’d be happy to clarify any doubts and queries you have.


Leave a Reply