The Social Icons block in WordPress allows you to add social icons to your WordPress posts/pages and link them to your respective social media profiles. You can connect many other platforms as well with this block alongside social networks.
This is a default Gutenberg block, allowing you to showcase 40+ social icons on any part of your website. This article will demonstrate how to use the Social Icons block in WordPress and make the best of it. Get started!
How to Use the Social Icons Block in WordPress
The Social Icons is an extremely useful block, especially for bloggers and content markers. By the following steps, you can find and use the block on your website.
Step 01: Add the Social Icons Block to Your Post/Page
Open a post/page. Press the Plus (+) on where you want to add the block. Type Social Icons in the search box of the Gutenberg editor.
You’ll see the block appearing below in a few seconds. Click on it to add the block to the post/page.
Once the block is added, you’ll get another Plus (+) icon created within it. Clicking on it will open up another Gutenberg editor containing the social icons. By default, you’ll see only six icons on the editor.
Press Browse all. This will open up all the social icons with a new sidebar on the left side.
Step 02: Add Social Icons to the WordPress Editor
Scroll up or down the list. Find the icons you want and click to add them one-by-one to the editor.
Step 03: Add Links to the Social Icons
Clicking on the icons will open up a box. You have to copy-paste your social profile link in the box. Do this one-by-one for each icon.
Step 04: Customize Settings of the Social Icons Block
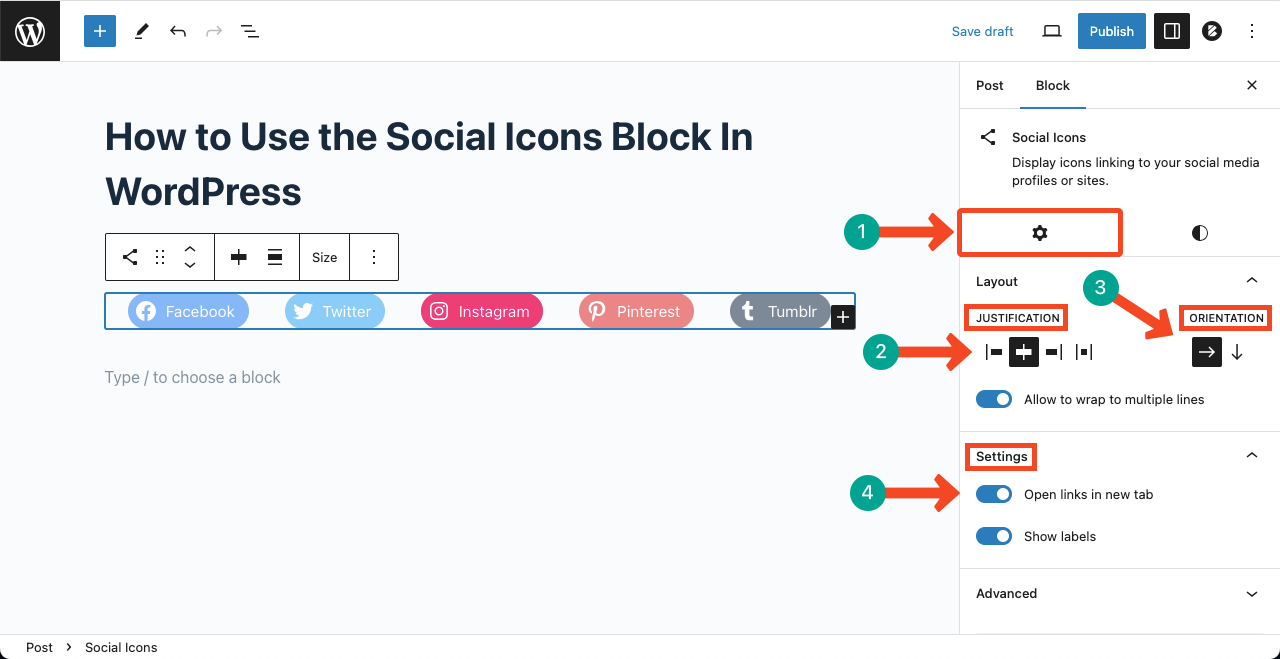
Go to the Setting tab on the right sidebar. You’ll get several options on the tab. Here’s what you can do with them.
Justification – Aligns the Social Icons, whether left, center, or right.
Orientation – Displays the Social Icons horizontally or vertically. Toggling on Allow to wrap to multiple lines will show the icons in multiple horizontal lines if you add too many icons.
Settings – Allow you to enable the options Open links in new tab and Show labels.
Step 05: Customize Stylizations of the Social Icons
Come to the Styles tab. You’ll get the following options under this tab.
Styles – You can show the social icons, whether by Logos Only or Pill Shape.
Color – Color has two options: Icon color and Icon background color. The Icon color will change the font color on the icons. The Icon background will change the color of all the icons.
Dimensions – It allows you to customize the margin and black spacing between the social icons.

Conclusion
As a content marketer, you must increase the followers on your social platforms so you can grow as an influencer in someday. The Social Icons block can help you a lot in this case. However, there are some best practices you must remember.
Be mindful of displaying these icons in a suitable place from where users will feel triggered to visit your profiles. Secondly, choose the social networks that are most relevant to your content. Finally, never forget to regularly update your social profiles.


Leave a Reply