HTTP Security Headers play a vital role on websites. If you are looking for a way to add HTTP security headers in WordPress, then you are in the right place. These headers allow you to add an extra layer of security to your website.
In this post, I have shown you the easiest way to add HTTP security headers in your WordPress website.
Let’s check.
HTTP security headers are a security measure that consists of metadata like status error codes, cache control, and content-encoding. Security headers keep you safe from some of the common security threats before they can bring any effect on your website.
When you try to visit a website, your browser sends a request to the webserver, and then the response is sent back to your browser with an HTTP header. This response tells all the details about catch control, error codes, and other statuses.
If the website is not found, it may send you a 404 error code, or for any server error, it may send you 500 internal server errors through HTTP security headers.
There are different types of HTTP security headers; let’s take a quick look at these and know-how do they protect your website.
Different Security Headers
There are various types of security headers. Here are some of those.
HTTP Strict Transport Security (HSTS)
The abbreviation of HSTS is HTTP Strict Transport Security. This header tells web browsers that your website uses HTTPS, and it will not be loaded in HTTP protocol.
X-XSS Protection
You can call x-xss as cross-site scripting. X-XSS Protection security header protects your sites against cross-site scripting.
X-Content-Type-Options
This security header blocks content mime-type sniffing. This security header protects content and reduces the risk of drive-by downloads.
X-Frame Options
This security header prevents clickjacking or cross-domain iframes. In clickjacking, an attacker makes the user fool by making him click into something that isn’t there. The user might believe that he is on the right website, but in the background, something else is running. In this way, hackers can steal your valuable information.
Adding HTTP Security Headers in WordPress Using .htaccess
There are a couple of ways to add HTTP security headers in WordPress. The best way is to add using the .htaccess file. If you don’t have any experience, you might try to get help of the plugins. Additionally, plugins provide more than security headers only.
Step 1: Open hosing Panel
First, log in to your website’s hosting panel or cPanel. From there, navigate to File Manager and find the root folder of your WordPress website.
As there is a (.) in the file name so it can be hidden. If you can’t find the .htaccess file, click on settings and select “Show hidden files”. Then select the file and choose Edit.
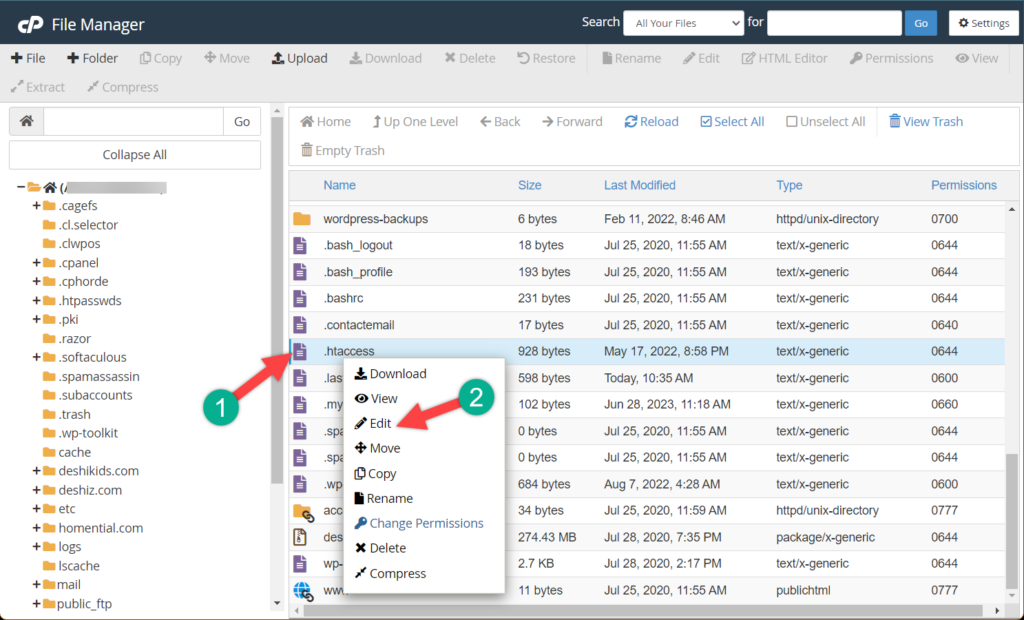
Step 2: Add Code to .htaccess
Now add the following code at the end of the file.
<ifModule mod_headers.c>
Header set Strict-Transport-Security "max-age=31536000" env=HTTPS
Header set X-XSS-Protection "1; mode=block"
Header set X-Content-Type-Options nosniff
Header set X-Frame-Options DENY
Header set Referrer-Policy: no-referrer-when-downgrade
</ifModule>
Don’t forget to save your changes and check if everything is working fine. Incorrect header conflicts may trigger 500 internal server errors.
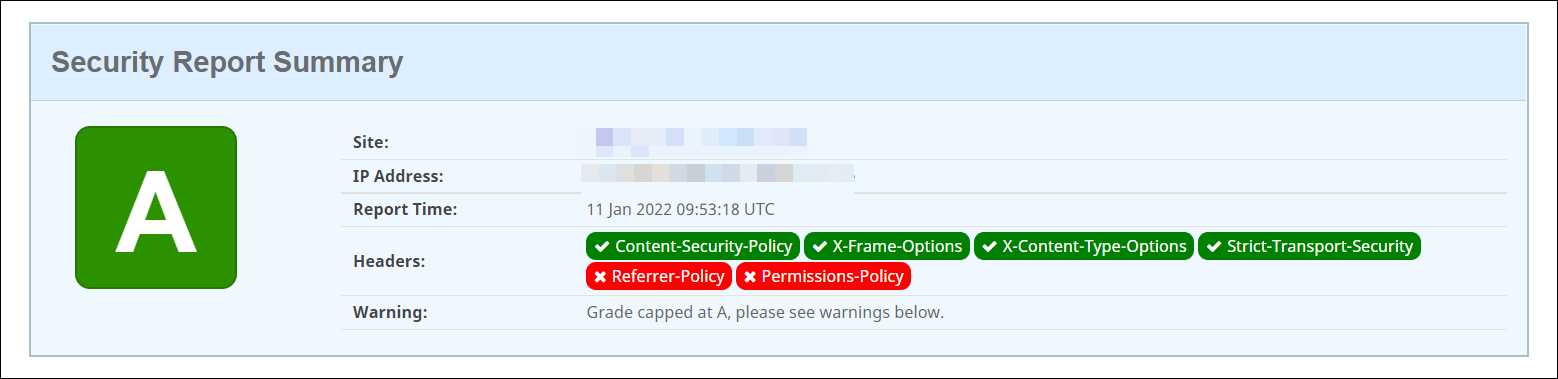
Step 3: Check if The Headers Are Working Fine
Now, navigate to securityheaders.com and check if the headers are working fine.
Last Words
I hope now you will be able to add security headers easily to your WordPress website. You can also add security headers and other securities with third-party plugins like Sucuri, Cloudflare, AIOSEO, etc. If you face any problems, feel free to tell your problem via the comment section of the post. If you liked the post, please share it with your friends.


Leave a Reply