
Customizing your WordPress site doesn’t have to be a complex procedure. While many themes offer a wide range of customization options, sometimes you need that extra customization option to truly make your site your own. That’s where custom CSS comes in handy. Whether you like to tweak the layout, change the appearance of specific elements, or give your website a personal flair, custom CSS can make it happen instantly.
Custom CSS is known as a life savior in the development world. For most beginners, it’s a little bit confusing to add custom CSS using FTP.
But there are always other ways to do it. In this post, I am going to show you three methods to easily add custom CSS to WordPress sites of yours. Afterward, you will be able to add custom CSS on your own.
Method 1: Adding Custom CSS to the Whole Site
If you are using Gutenberg and would like to add custom CSS to the whole site, then you have to use the ‘Simple Custom CSS and JS’ plugin. This plugin allows you to write CSS code for any portion of the website.
Step 1: Install Simple Custom CSS and JS Plugin
From your dashboard, navigate to Plugins -> Add New Plugins and search for the ‘Simple Custom CSS and JS‘ plugin.

Install the plugin and activate it.
Step 2: Write Your CSS Code
Now navigate to ‘Custom CSS and JS’ from your dashboard and click on ‘Add CSS Code’.

Provide a tile, and then write your CSS code on the code field.

Afterward, select the linking type and for which element you would like to write code. Lastly, choose where you like to deploy your code and then hit the publish button.
Your Custom CSS will be applied to the site.
Method 2: Adding Custom CSS to Blocks in Gutenberg
If you would like to add custom CSS directly to your blocks in Gutenberg, this is the best method. To do this, you have to use the Blocks CSS Plugin. This versatile plugin allows you to add CSS without any complexity. Follow the steps below and then do it yourself.
Step 1: Install the Blocks CSS Plugin
From your WordPress dashboard, navigate to Plugins -> Add New Plugin and search for ‘Blocks CSS‘.

Install the plugin, and don’t forget to activate it.
Step 2: Add CSS Code to Block
Now open the page/post where you want to apply CSS code.

Select the block and open block settings. Click on ‘Custom CSS’ and write your CSS code there.
For every block, you will be able to write CSS code individually.
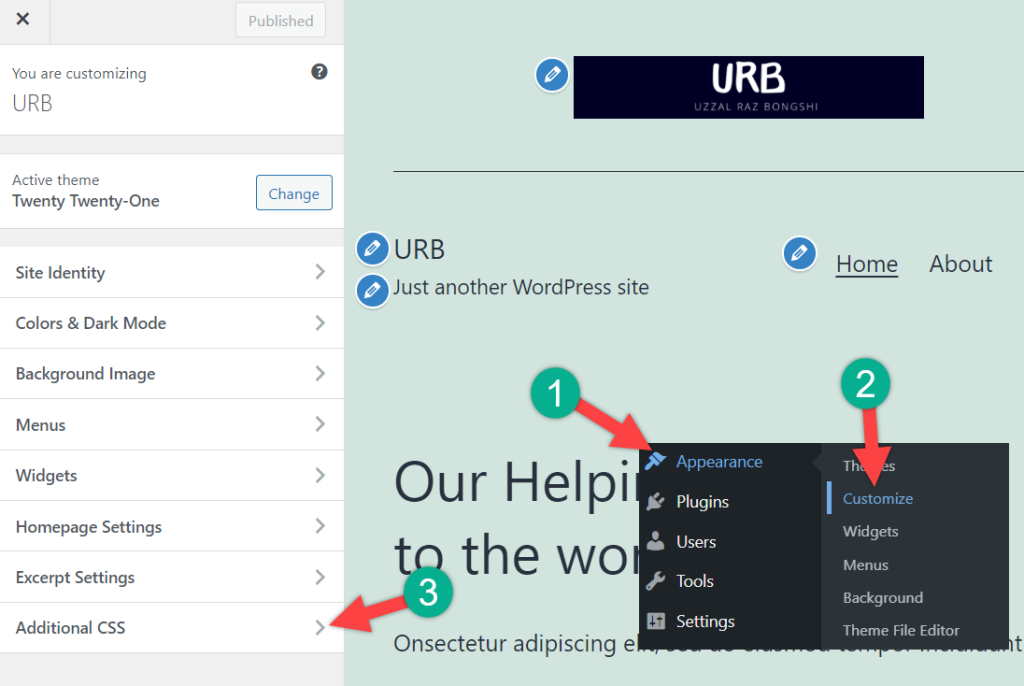
Method 3: Adding Custom CSS Using Theme Customizer
If you are using the old version of WordPress, then this method is for you. Adding custom CSS is super easy as you can add directly from the admin area. There’s no complex procedure, and you will be able to see your changes instantly through a live preview.
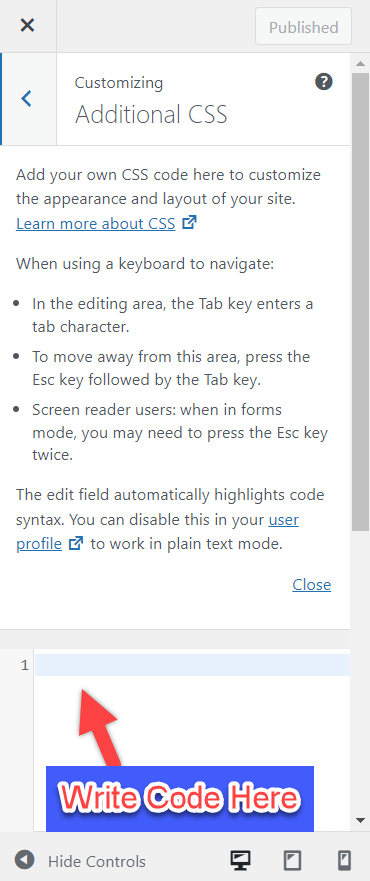
At the beginning, navigate to the Appearance -> Customize page. When the customize page opens, scroll down and find ‘Additional CSS’.
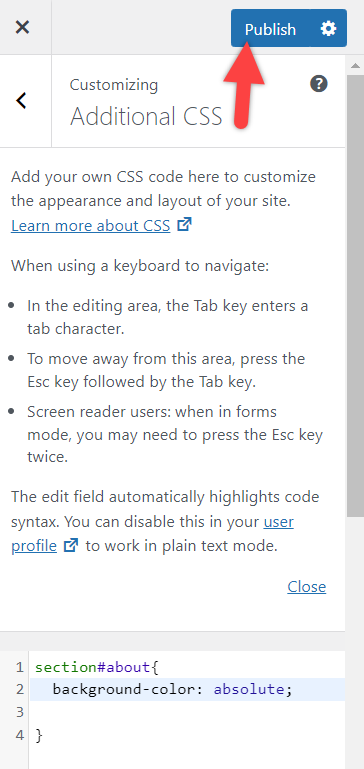
Click on Additional CSS and then you will find a small box to write your CSS code in it. As soon as you write valid CSS codes, you will find it automatically applied to your website’s live preview pane.
You can continue writing your codes until you are satisfied. When you are finished coding, don’t forget to click on the ‘Save & Publish’ button placed on the top.
Final Words
I hope this post helped you to easily add custom CSS to your WordPress site of yours. If you face any trouble, comment in this post, and I will be happy to help you. If you liked this post, then share it with your friends, and don’t forget to write about your thoughts.
Changelog
- Updated on 2024-09-15 (Uzzal Raz Bongshi)
- Update Intro.
- Added ‘Method 1: Adding Custom CSS to the Whole Site’.
- Added ‘Method 2: Adding Custom CSS to Blocks in Gutenberg’.


Leave a Reply