
A text slider lets you display your headlines, quotes, or messages one after another to grab readers’ attention without cluttering the design.
Whether it’s a customer testimonial, a product announcement, or a motivational quote, a text slider keeps things dynamic and clean.
In this post, you’ll learn how to create a beautiful text slider in WordPress using Slider Block by Sliderberg – a free and lightweight plugin built specifically for the WordPress Block Editor (Gutenberg).
Let’s get started!
Text Slider Demo (Built with Sliderberg)
Here’s a fun example showcasing what you can do with a simple text slider using Sliderberg:
All created using the Sliderberg plugin, directly inside Block Editor (Gutenberg).
How to Add a Text Slider in WordPress (Step-by-Step)
Now let’s see how to create a text slider using the Sliderberg plugin. We will show you everything from the scratch.
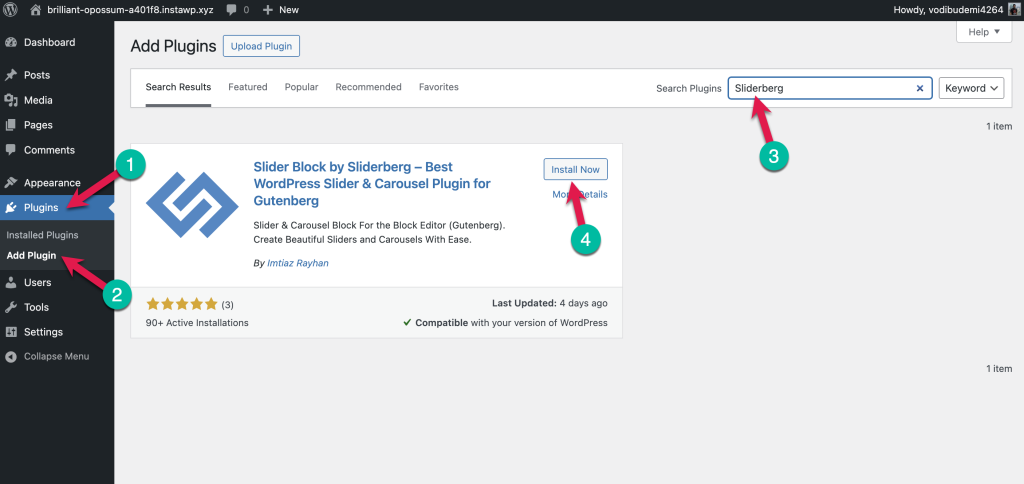
Step 1: Install the Sliderberg Plugin
First, go to your WordPress dashboard and navigate to Plugins > Add New. Then search for Sliderberg, and click Install Now button. Finally, activate the plugin.
Step 2: Add the Sliderberg Block
Open the page or post where you want to display your slider. Click the + Block Inserter, search for Sliderberg, and insert the block.

Step 3: Choose Slider Type
Once you add the block, you’ll be asked to choose a slider type. Select the Blocks Slider option.

Step 4: Add a Background Color or Image
For each slide, you can set a custom background. You can either choose a solid color or upload a background image.

Step 5: Add Text Content to Your Slide
Click Add Slide, then insert a heading or paragraph block. Style your text using Gutenberg’s standard toolbar.

Step 6: Add More Elements (Optional)
Want to add a button or other content? Use the + button to insert any block like Paragraph, Button, Quote, or List.

Step 7: Add More Slides
Once you’re done creating the first slide, click on the ‘Add Slide’ button to add another slide. You can also duplicate the slide.

Step 8: Customize Slider Settings
Use the sidebar to configure animation, autoplay, navigation arrows, and more.

Step 8: Publish and Preview
Once your slider is ready, click Publish and preview your page. Your text slider should now be live and fully functional!
Why Use Sliderberg?

If you’re still wondering why you should choose Sliderberg, here are some reasons.
- Made for Gutenberg – No shortcode or external editor
- Fully block-based – Add any content inside slides
- Custom backgrounds – Color or image support
- Lightweight & fast – Built with performance in mind
- Free to use — No pro upgrade required to create stunning sliders
Final Thoughts
Creating a text slider in WordPress doesn’t have to be complicated.
With Sliderberg, you can build flexible, beautiful sliders right inside the WordPress editor – no need for extra tools or shortcodes.
Try Sliderberg today and elevate your content with smooth, modern sliders.


Leave a Reply