
If you are looking for a way to create a file upload form on WordPress site of yours, then you are in the right place.
A file upload form helps you to collect different types of files, including audio, video, and image. After collecting the data, you will be able to check all the data and files from one place.
In this post, I am going to show you two processes. After reading the post, you will be able to do it on your own.
Why File Upload Form is Needed
There is a lot of situations where you need to collect data from your users. Using an upload box on your website allows your users to upload data directly to you. It makes life easier for both you and your users.
The method to create a file upload form described here is very convenient. Let’s take a look at how to do it.
Method 1: Create a File Upload Form Instantly
If you don’t have all the time in the world and want to create a file upload form instantly, then this method is for you.
Step 1: Install the WordPress File Upload Plugin
From your WordPress dashboard, navigate to Plugin -> Add New Plugin and search for ‘WordPress file upload’.

Install the plugin, and don’t forget to activate it.
Step 2: Create a File Upload Form
Open the page/post where you want to create a file upload form. Click on the add block button and search for shortcode block.

Add the block by clicking on it.
[wordpress_file_upload]Now, paste the above code into the text field.

Save/update changes, and you will have a file upload form instantly.

Step 3: Configure Upload Path(Optional)
The default path for uploaded files is the uploads folder. If you like to configure the upload location or change any settings then navigate to Settings -> WordPress File Upload. Then click on your instance.

Scroll below and from the ‘Upload path’ define the path.

There is also other settings; customize those at your own will.
Step 4: View Uploaded Files
To view the uploaded files, click on ‘Uploaded Files’ from your dashboard.

Then, download the file by clicking on the download button.
Method 2: Create a File Upload Form in WordPress
To create a file upload form in WordPress here, I am going to use the Fluent Forms plugin.
Step 1: Install Fluent Forms
First, download and activate Fluent forms from the WordPress plugins repository.

As the file upload form is a pro feature, therefore you have to buy the pro version of the plugin first.
Click on the Fluent Forms and then hit ‘Upgrade to Pro’. Choose your package and follow the procedure to purchase the plugin.
Step 2: Add a File Upload Form
Afterward, Navigate to Fluent Forms -> All Forms and click on ‘Add a New Form’.

To do it quickly, you can use the template; just search on the box with the term ‘Multi file upload form’. Then click on the form to insert it.

You will see that a basic form with name, email, number of files, comments, and multiple file upload option is inserted.
You can click on any field and edit the settings on the right side.

If you don’t need any field, you can delete it by pressing the delete button on the mouse hover.

If you need to add any field, click on the ‘+’ button, and you will find a lot of fields; just click on the item, and it will be inserted.

Step 3: Add a File Upload Field
In this template, it allows you to upload 1-5 files at once. If you need more files to be uploaded, click on the ‘+’ button and add the File Upload field.

Then click the field, and from the right side option, scroll below to Advanced Options.

Then on the last field, put the value. If you had 5 upload boxes earlier, then put 6 in this field. If you again put another File upload box, then put 7 in the field, and so on.
Step 4: Customize Form Settings
In the settings of the File upload field, you can see a lot of options. I am going to give you a short description of these settings; then you optimize the settings as you require.

Element Label: This is the title that will be shown on above of your upload box.
Button Text: this text will be shown inside the button.
Label Placement: This option allows you to adjust the placement of the label. You can choose any position. But the best position is the default.
Required: If you want your user to must use this field, then click on yes, else no.
Max File Size: Define the file size using this option.
Error Message: Define your error message for file size limit error here.
Max Files Count: This option defines how many files the user can upload.
Allowed Files: You can specifically define the file type to be uploaded. You can select more than one type. If you don’t choose any file type, user can upload any type of file.
File location Type: With this option, you will be able to set the location, where uploaded files will be stored.
After you are done customizing your file upload form, don’t forget to hit the save button and copy the shortcode that you see by hitting the copy button.

Step 5: Add Upload Form to Your Website
Open the page or post where you want to add the Upload Form. Click on the add block button and search for the ‘shortcode’ block. Insert the block by clicking on it.
Now paste the code that you copied earlier inside the shortcode box and save changes.

Your form will look something like this below.

Step 6: View Responses and Uploaded Files
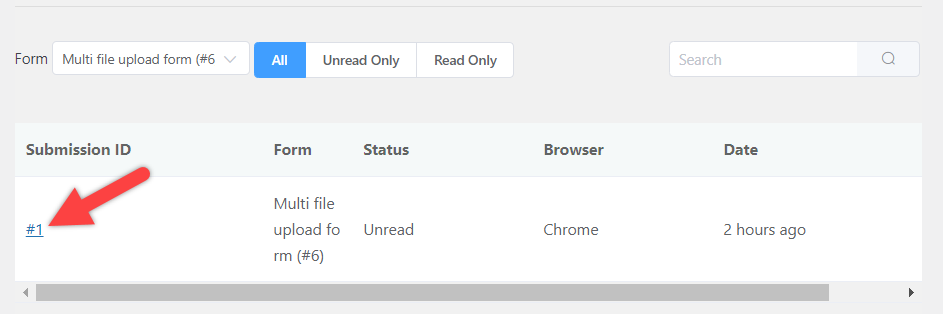
You will be able to see your responses in the dashboard and also in Fluent Forms -> Entries.

When you hit entries, scroll below and click on a ID to see its data and uploaded file.
Later on, you will be able to download file that was uploaded by clicking on it.

Final Words
I hope you have got both processes. If you are having any trouble creating a file upload form, then you may ask for help, I will be happy to help you. If you liked the post then share it with your friends, and don’t forget to leave your thoughts in the comment section below.
Changelog
- Updated on 2024-10-05(Uzzal Raz Bongshi)
- Added ‘Method 1: Create a File Upload Form Instantly’
- Updated Method 2.
- Updated images.


Leave a Reply