If you’re selling any product or service on your WordPress site, you need to have pricing tables on the product/service pages.
When it comes to adding pricing tables in WordPress, you can build one using the default Block Editor. But the problem is that it’s not easy to create beautiful and conversion-optimized pricing tables if you don’t have coding skills.
What you can do is use a plugin or create one using the block editor. There are a handful number of pricing table plugins out there. In this post, I will show you to create a pricing table by using the WP Table Builder plugin and also with the Gutenberg block.
Without further ado, let’s dive into the tutorial.
Creating a Pricing Table Without a Plugin
To create a pricing table without a plugin, you have to do it all by yourself from the beginning. To do this follow the steps below.
Step 1: Add a Column
Open the page/post and click on the add block button. Search for the ‘column’ block.

Insert the block by clicking on it.
Depending on your pricing table size, choose the number of columns.

Here, I am choosing 33/33/33, therefore there will be three columns.
Step 2: Create a Pricing Table
Now, its time to create pricing table. On the first column, click on the add block button and insert Heading block.

In the heading write your plan name and hit enter button.
Again click on the add block button and insert ‘spacer’ block.

This will add some space after the plan name. Again insert header block for the price.

Write your price and make the header smaller. Here, I am choosing H4.

Now hit ‘Enter’ button and type other details for your pricing plan, one line after another. Where, you think a little bit space is needed, insert a ‘spacer’ block.

Make sure every content you add is in center alignment.
Finally, add a button at the buttom.

Afterward, add your link to the button and hit Enter button.

Step 3: Customize Pricing Table
Now, that you have the pricing table of one part, but it doesn’t look good. Click on each block and customize as you like.

Make every block look better with your customization. When you are done, select the whole column block and hit duplicate button.

Duplicate it as the number of plans you have and then delete previous columns.

Now, change the content of the other columns. Finally, if you want to customize it further, you can make the middle column of different color.

Finally you will have a pricing table like this below.

If you don’t have time for customization or to build one from scratch, then you may copy the pattern from here. Then paste in directly in your page.
Creating a Pricing Table Using a Plugin
If you like to create a pricing table easily with lots of customization options, then this method is for you. Just follow the below steps and then try it yourself.
Step 1: Install WP Table Builder
Creating a pricing table with WP Table Builder is very easy. The drag-and-drop editor makes it insanely easier. It also has some pre-built pricing table templates in the pro version.
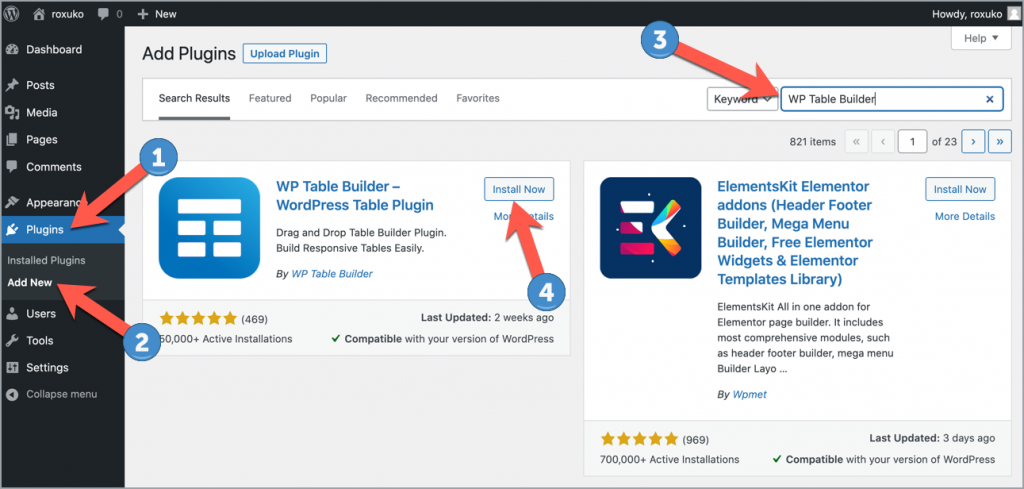
Now, let’s install the plugin. Just go to your WordPress Dashboard > Plugins > Add New and search for WP Table Builder. Install and activate the plugin.
Step 2: Add a New Table
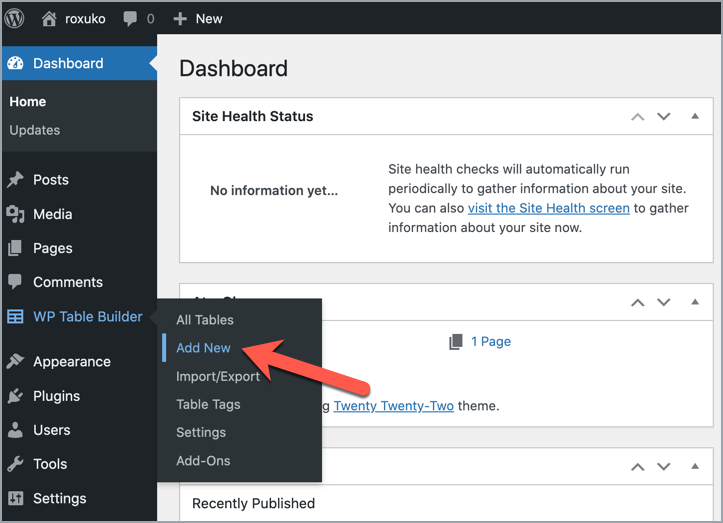
After activating the plugin, a new menu called ‘WP Table Builder’ will be added to your dashboard. Just click on the ‘Add New’ from the WP Table Builder menu.
The table builder interface will be popped up. Now give a name to your table (1),
On the next page, provide the name of your table. In the below of this page, you will found templates. Just choose your preferred one and click on the generate button.

Step 3: Customize the Table
Now customize the table elements and contents according to your needs.

You can add more elements to your table. Just drag and drop one from the left sidebar, then edit as you want.

Step 4: Embed the Table
When the customization is done, click on the “Save Table” button at the top right corner. Then click on the cross button or navigate to WP Table Builder -> All Tables.

Copy the shortcode and paste it on your page or post. Insert a shortcode block.

Paste the code that you copied in the box.

Click on Save Changes and your pricing table is ready.

Conclusion
Isn’t it easy? Now go and create a pricing table for your website. If you liked this post share it with your friends. If you face any trouble creating a pricing table, feel free to ask for help. Don’t forget to leave your comments below.
Changelog
- Updated 2024-05-27 (Uzzal Raz Bongshi)
- Added ‘Creating a Pricing Table Without a Plugin’ section.
- Updated screenshots.
- Update Intro.
Leave a Reply