
A floating sticky button is one of the simplest yet most effective ways to boost engagement and conversions on your website. Whether it’s a call-to-action (like “Get Started” or “Subscribe Now”) or a quick contact link (like WhatsApp or Email), a floating button ensures your visitors always see the action you want them to take.
In this tutorial, I’ll show you how to easily create a floating sticky button in WordPress using ConvertForce (a powerful conversion plugin by Ultimate Blocks team). With ConvertForce, you can create sticky buttons, notification bars, popups, slide-ins, and more — all using the native WordPress block editor.
Let’s get started.
What is a Sticky Floating Button?
A sticky floating button is a button that stays fixed to a specific position on the screen (like the bottom-right corner) even when users scroll through your website.
It’s commonly used for:
- Highlighting important CTAs (Call-to-Actions)
- Linking to chat tools (WhatsApp, Messenger, etc.)
- Redirecting users to special offers or forms
- Helping users navigate easily
In short, it’s an always-visible button that grabs attention without disrupting the browsing experience.
How to Add a Sticky Floating Button in WordPress
Here’s a step-by-step guide on how to create one using the ConvertForce plugin.
Step 1: Install & Activate the ConvertForce Plugin
First, install and activate the ConvertForce plugin.
Go to your WordPress Dashboard → Plugins → Add New Plugin and search for “ConvertForce.” Once you find it, click Install Now, then Activate.
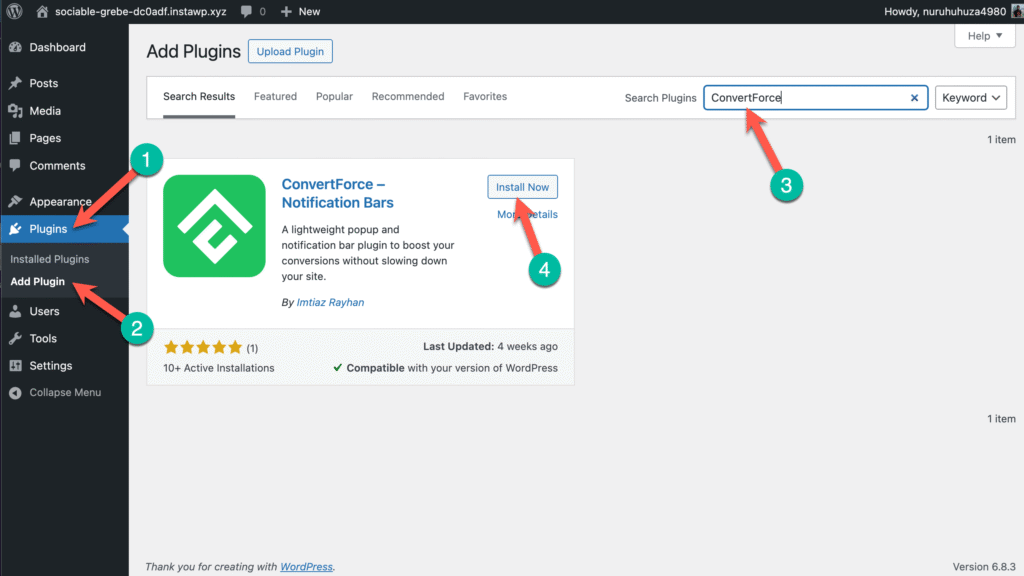
After activation, you’ll see a new ConvertForce menu on your WordPress dashboard.
Step 2: Add a New Campaign & Choose the Campaign Type
Next, navigate to ConvertForce →New Campaign.
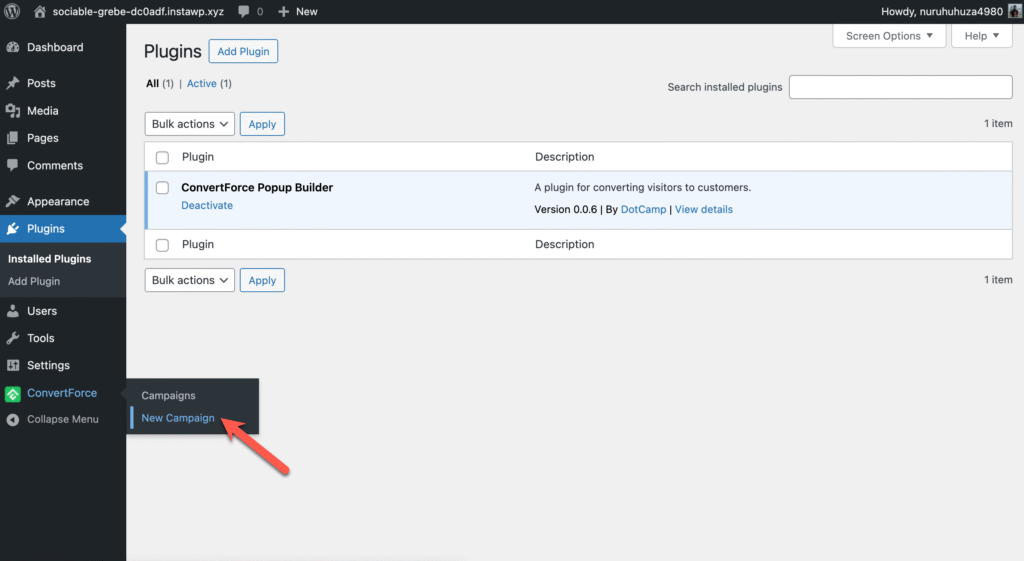
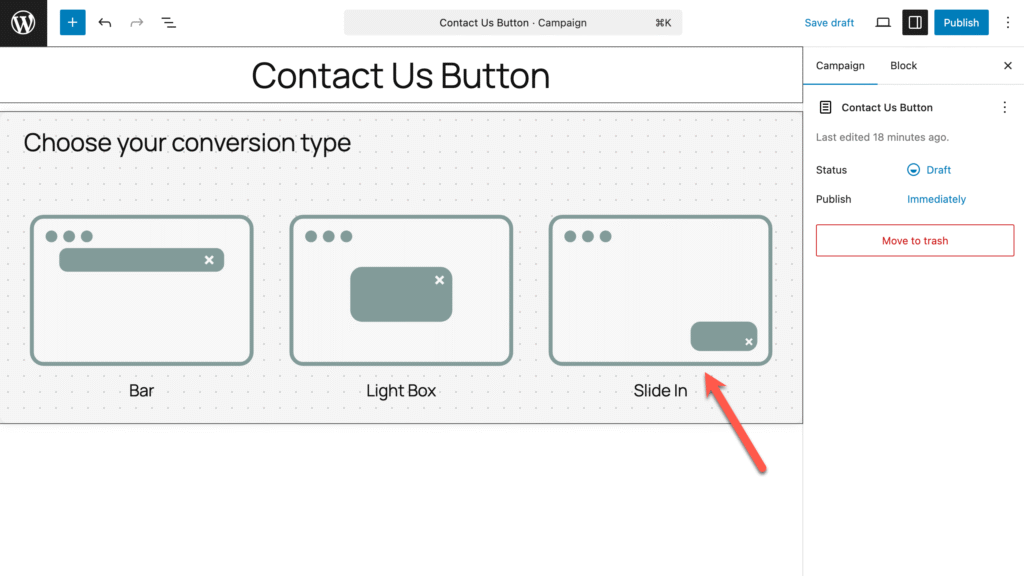
You’ll be prompted to choose a campaign type. Select Slide-in as your campaign type – this layout allows us to position a button that can float at the edge of the screen.
Step 3: Add the Sticky Button
Inside the Slide-in campaign editor, type slash and write button. And insert the ‘Buttons’ block .
Then:
- Add your button text (e.g., “Contact Us” or “Get Offer”)
- Set the URL where the button should redirect users
- Customize the button color and text color to match your site’s branding
Step 4: Disable the ‘Close’ Option and Customize the Background
By default, ConvertForce’s Slide-in includes a close (×) button. For a floating sticky button, it’s better to disable this option so the button remains visible.
To do that:
- Go to the Settings tab of your campaign
- Turn off the “Close Button” option
Next, make the button background transparent for a clean look:
- Go to the Styles tab
- Clear the Background Color and remove the Box Shadow
Step 5: Change Button Position (if needed) and Publish the Campaign
You can easily change the position of the button from the Campaign tab.
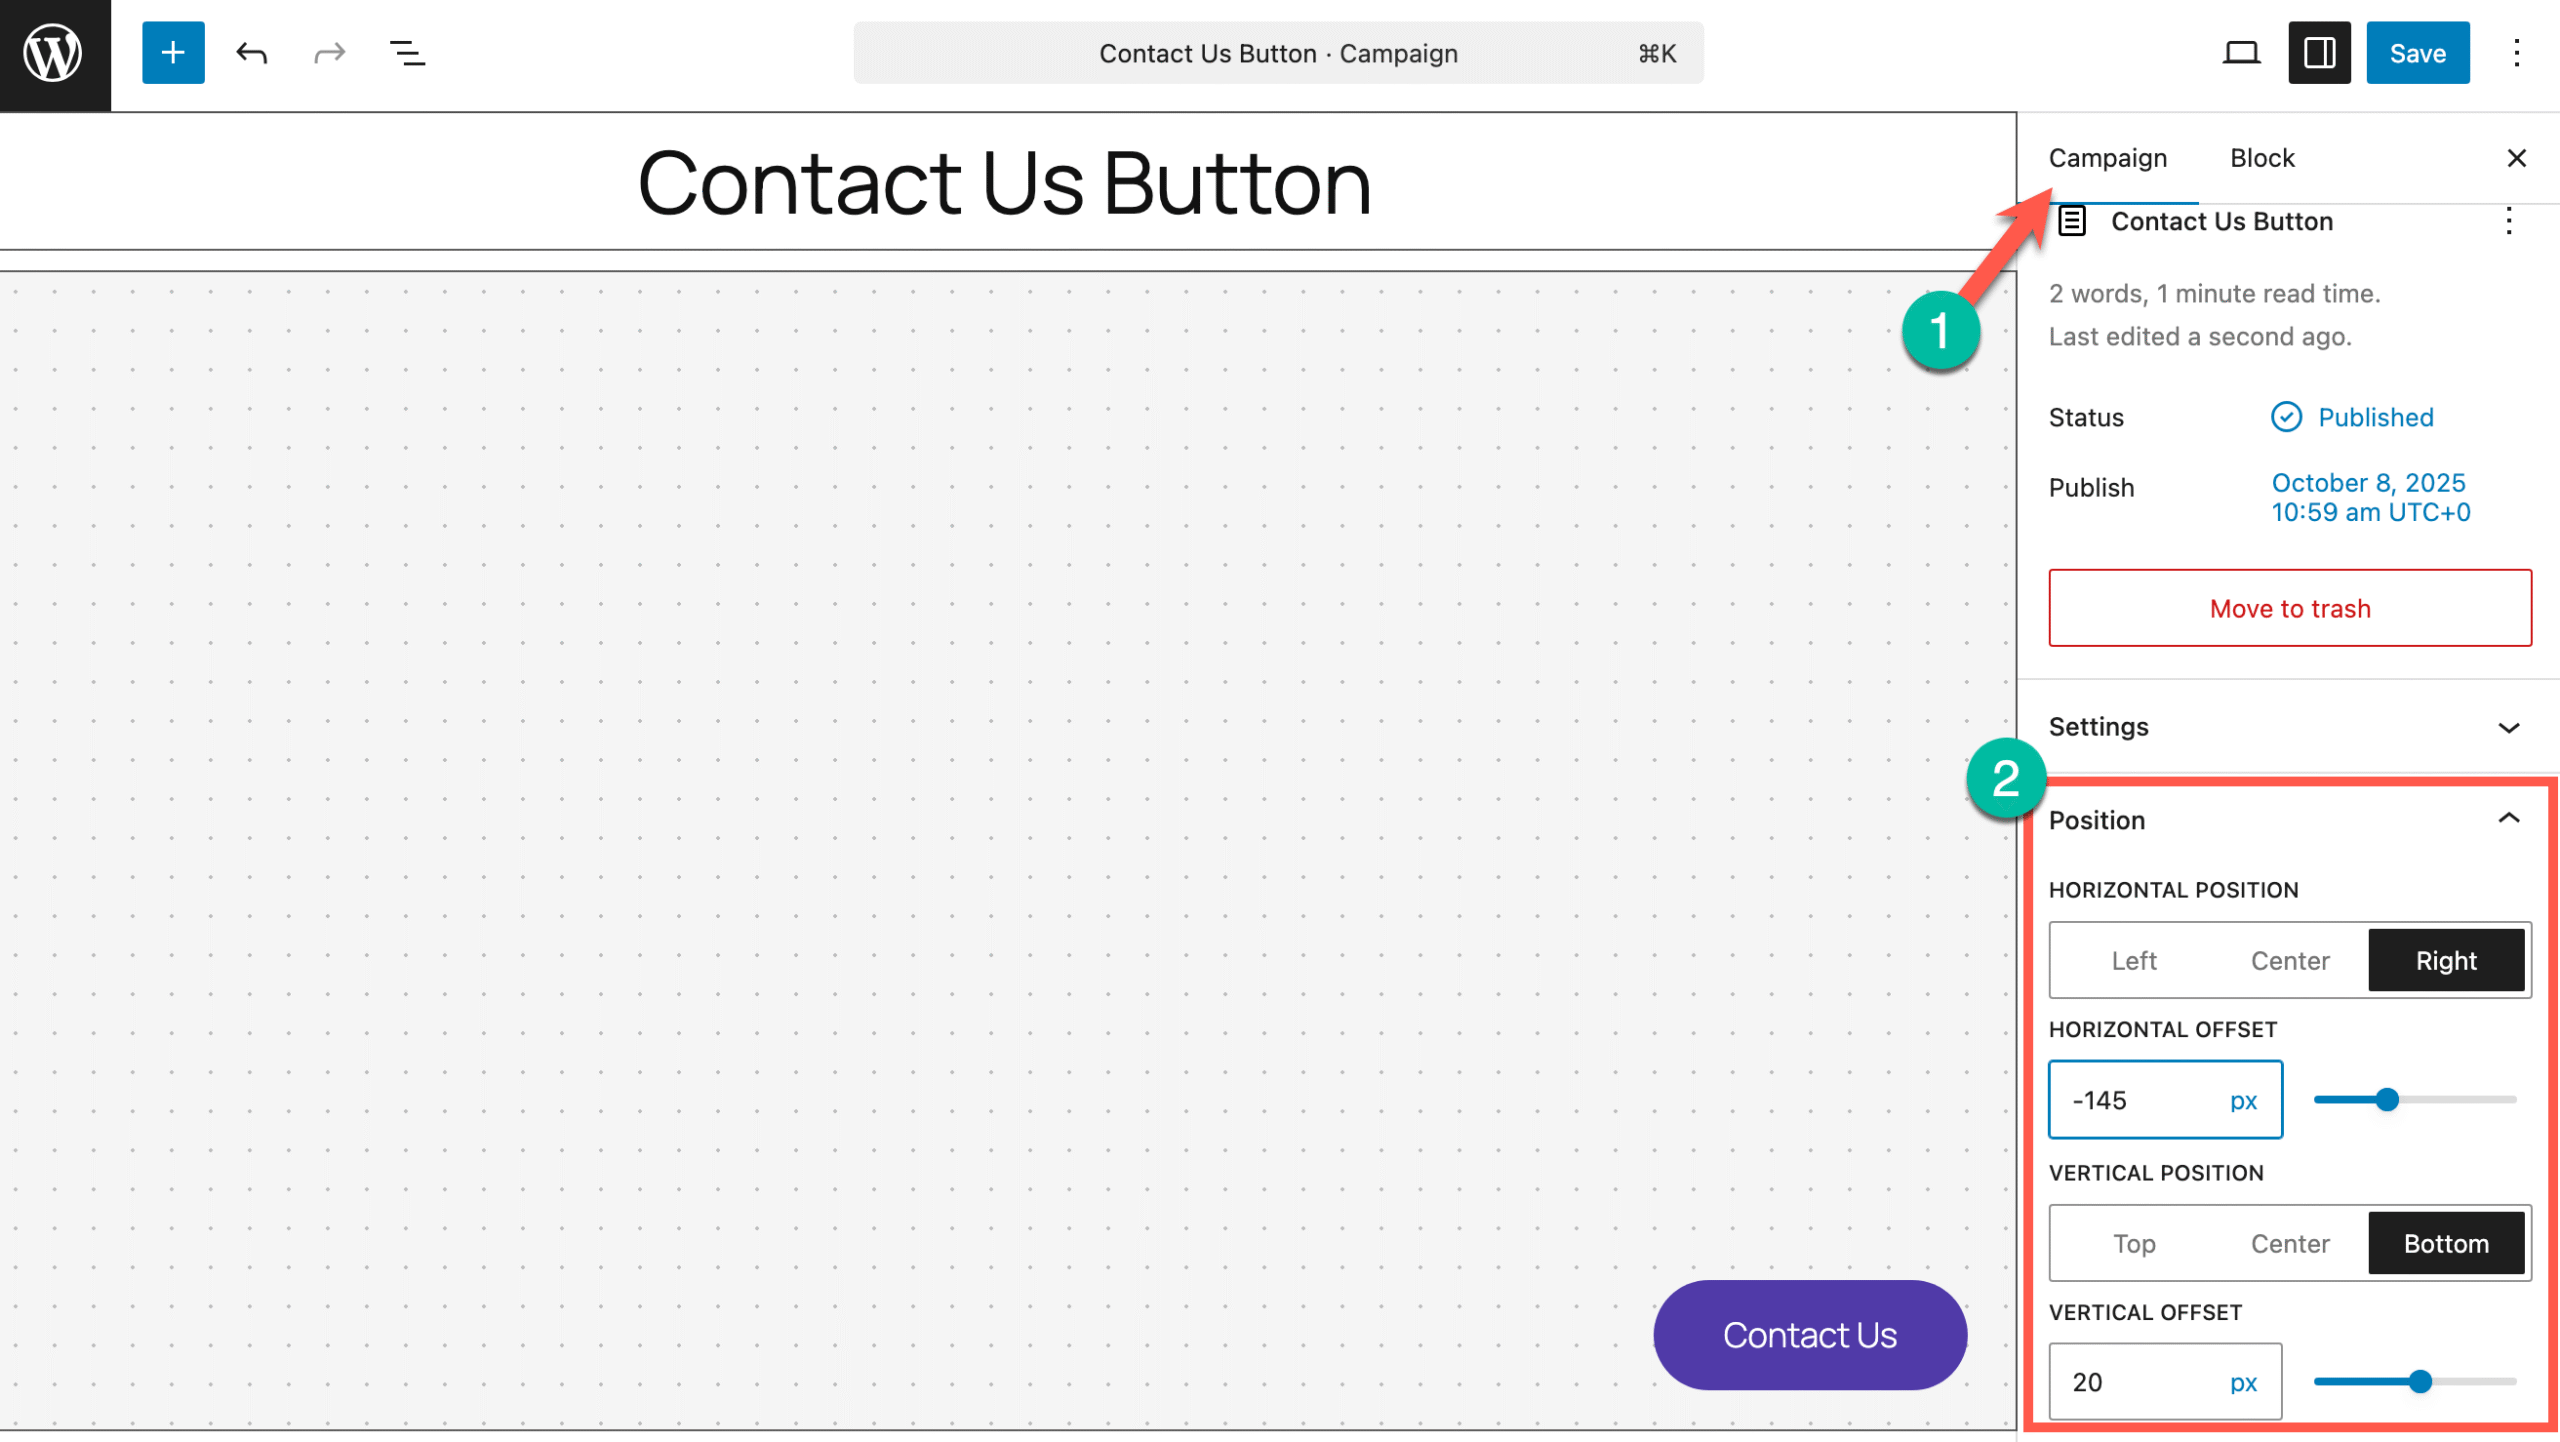
Once you’re satisfied with how it looks, click Publish to make your sticky button live on your website.

Conclusion
That’s it! You’ve successfully created a floating sticky button in WordPress using ConvertForce.
Unlike traditional button plugins, ConvertForce gives you complete design freedom inside the block editor — so you can easily build buttons, popups, and CTAs that look great on any device.
If you want to take your CTAs to the next level, explore other campaign types in ConvertForce like Popups, Notification Bars, and Inline CTAs — all designed to boost your website conversions effortlessly.
Related Posts
- How to Add Icons to Buttons in WordPress (With/out a Plugin)
- How to Add Icons in WordPress
- How to Add Buttons in WordPress
- How to Add a Button Over an Image in WordPress
- How to Add a Search Bar in WordPress


Leave a Reply