Want to elevate your website’s user experience and visual appeal? Incorporating icons into your buttons might be the game-changer you need. Not only do icons add a touch of aesthetic elegance, but they also make your site more intuitive, guiding visitors to take their desired actions more efficiently.
If you’re worried about the complexity of implementing this change, there’s good news. I’ll walk you through two straightforward methods to add icons to your WordPress buttons—one without any plugins and another utilizing a user-friendly button plugin.
Let’s dive in and transform your website buttons into powerful calls to action.
Supercharge Your WordPress Block Editor!

Method 1: Adding Icons Without a Plugin
If you don’t want to use a plugin, you can follow this procedure. Here, we will use an inline image as an icon.
Step 1: Add the Buttons Block
Go to the post/page where you want to add the icon button. Then click on the + icon, search for ‘Buttons,’ and click on it to add a button.

Step 2: Add an Icon to the Button
Now, add a text to the button and place your cursor at the point where you want to add an icon.

Then click on the dropdown icon from the toolbar and select ‘Inline image’.
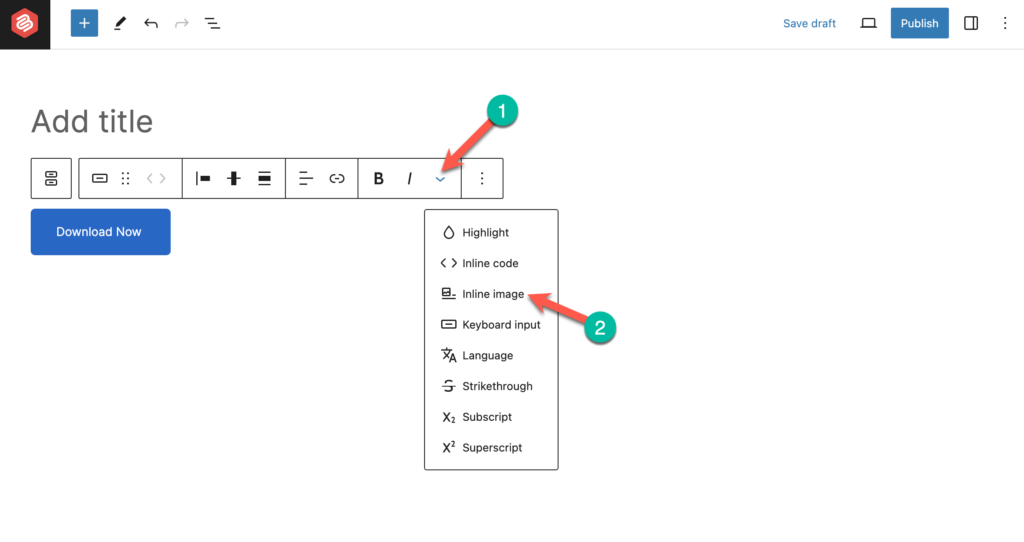
Then, upload your desired icon image and hit the ‘Select’ button.

Step 3: Resize the Icon
Upon adding an icon image, you may need to change its width to fit your button. Just click on the icon image and set the width as you wish.
Step 4: Customize the Button (Optional)
If you want, you can customize the button from the right-hand side options panel. Click on the ‘Settings’ icon from the top right-hand corner and select the ‘Styles’ tab. Here, you can change the color, typography, border, etc of the button

Once you’ve added an icon to the button, remember to publish or update the post/page.
Method 2: Adding Icons Using a Plugin
Using a plugin is better if you prefer to do it more professionally and easily. Here, we will use the Ultimate Blocks plugin, which comes with a button block.
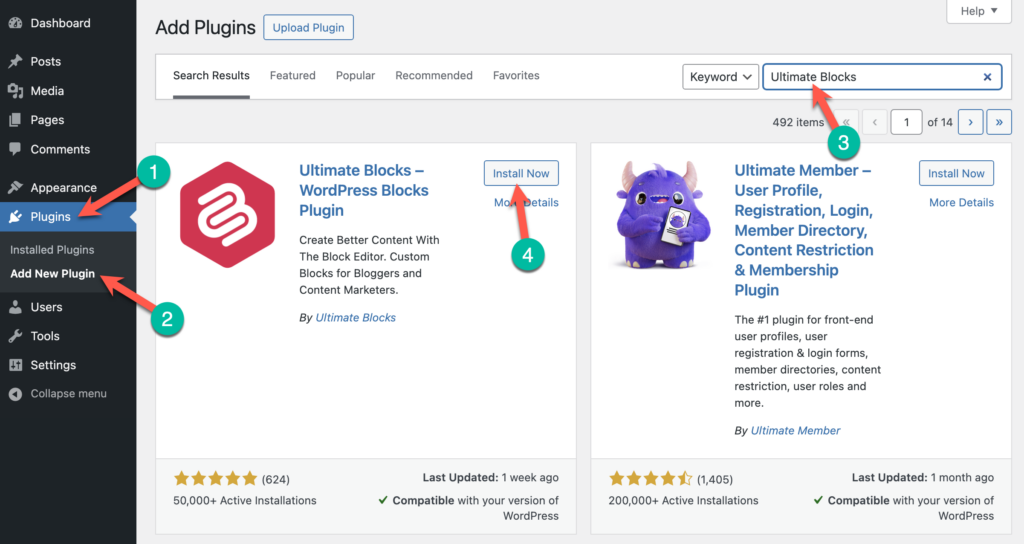
Step 1: Install the Ultimate Blocks Plugin
First, go to your WordPress Dashboard and navigate to Plugins > Add New Plugin. Then search for ‘Ultimate Blocks’ and install & activate the Ultimate Blocks plugin.
Step 2: Insert Button (Improved) Block
Open the page post/page where you want to add an icon to the button. Then click the + icon and search for ‘Button (Improved). Click on it to insert it.

Step 3: Add an Icon to the Button
Click on the button and add your desired text.

Then click on the block ‘Settings’ icon at the top right-hand corner, scroll down to the Icon section, and select ‘preset’ as the icon type.
Then, search for your desired icon and click an icon to insert it.
You can also change the icon position and icon size.
Step 4: Customize the Button (Optional)
If you want to customize your button, switch to the styles tab and change styles, colors, borders, and more.

Don’t forget to publish or update the post/page to save the changes.
Last Words
I hope you find this post useful and that you successfully learned how to add icons to buttons in WordPress. If you have any queries, feel free to ask. Besides, if you want to explore more creativity inside you, play with Ultimate Blocks on your website and create whatever you wish in a simple way.
If you liked the post, share it with your friends, and don’t forget to leave your thoughts below.
Related Posts:
- How to Add Icons in WordPress
- How to Add Buttons in WordPress
- How to Add a Button Over an Image in WordPress
- How to Add a Search Bar in WordPress
Changelog
March 27, 2024
- Update the screenshots.
- Change the featured image.


Leave a Reply