
Searching for a way to learn how to make a block sticky in WordPress? We will share the details about it here.
If you want to display an important message, a special promotion, or a key piece of content on your WordPress site that you don’t want your visitors to miss, you must make that block sticky.
If you make your block sticky, that section stays in view as users scroll through your webpage. It is extremely helpful to display a CTA button, a subscription form, or a custom message.
So, let’s learn how to make a block sticky in WordPress within a few steps, ensuring your key content gets the attention it deserves and elevating your website’s overall user experience.
We will show you two ways, following which you can eaisly make a block sticky in WordPress.
At first we will show you how you can make a block sticky in WordPress without using a plugin. After that we will show you how you can do the same task by usiung a plugin.
So, let’s dive in to the details below.
How to Make a Block Sticky in WordPress Without Using a Plugin
To make a block sticky in WordPress without using any plugins, we will guide you through some simple steps. All you need is to follow them thoroughly.
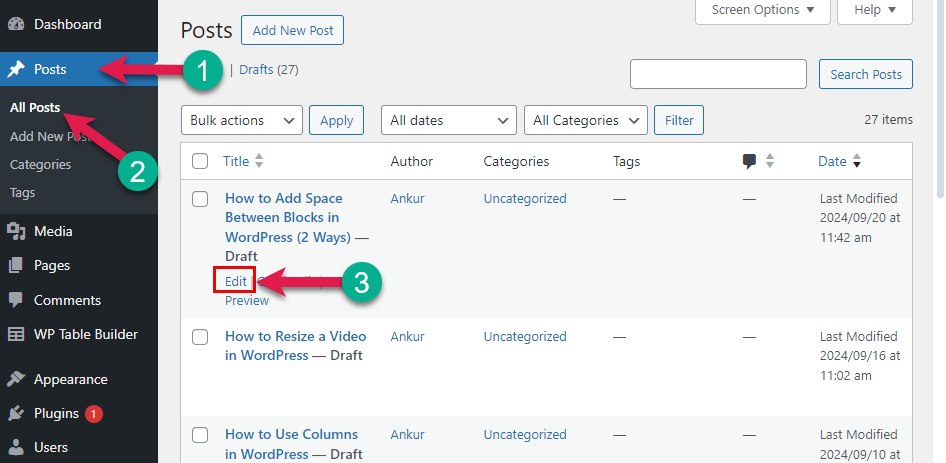
Step 1: Go to Your Post or Page
Go to your post or page where you want to make images of full width. For that, navigate to Posts/Pages(1) > All Posts (2), and edit that post or page (3).
Step 2: Group the Blocks
In this step, you must select and transform your blocks into the Group block. You can display multiple blocks or a single block.
For that, select the block and click the Options (1), select Group and it will be Grouped.

Step 3: Change the Position to the Sticky
Select Grouped Block, and click on the Group.

Now, go to the block settings by navigating to Settings > Block > Settings.

Scroll down a bit, select Position (1), click on the box (2), and finally select Sticky (3).

And that’s all the steps you need to follow to make your blocks sticky. Don’t forget to save or publish your post or page after completing all the steps.
Here is the demo for you.

How to Make a Block Sticky in WordPress Using a Plugin
As for the second method, we will use a free plugin called Sticky Block for Gutenberg Editor.
Step 1: Install the Sticky Block for Gutenberg Editor
To install the Sticky Block for Gutenberg Editor, go to your website’s dashboard.
Now, navigate to Plugins (1) > Add new Plugin (2). Search for the Sticky Block for Gutenberg Editor (3) and install the plugin (4).

After that, you must activate the plugin (1).

Step 2: Insert the Advanced Video Block
Go to your post or page where you want to add your slideshow. Click the + icon (Add Block) in the editor (1) and type “Sticky” in the search box (2). Click on the Sticky to insert it into the editor(3).

Step 3: Insert Your Content
Now, insert your content or other blocks inside the Sticky Block. And your content will be sticky. I have added background and text color so that my sticky block stands out in the content.

Here is the final demo below.

Bonus Content!
To make your Sticky block or sticky blocks stand out you can change their background color and Text color.
How to Change Your Sticky Block’s Background and Font Color
To change the background color, select the block and navigate to Settings (1) > Block (2) > Styles (3)> Background (4).

Change the bakground color that you need. You can select from the predefined colors, or from the color picker, or just put your hexa code for your sticky block’s background.

Here’s how the block looks after selecting the background color. I have used “#e11b4c” hexa code for my background.

You can also change the font colors to match your brand. to change the font color, selet the block and navigate to Settings (1) > Block (2) > Styles (3)> Text(4).

Select any color you like for your text color. I have selected the plain white for my text color.

So, this is how you change your font and background color in WordPress.
Final Thoughts!
I hope you found this tutorial helpful and easy to follow. If by any chance, you’ve faced difficulties following the tutorial, let me know in the comment section below. I would be happy to help.
Also, spread this knowledge to your other friends who started learning WordPress. You can learn more if you follow our blog.
Read More about WordPress


Leave a Reply