If you are looking for the easiest guide on How to Create Icon Boxes in WordPress, you are in the right place on the right time.
Creating icon boxes in WordPress is not just a way to draw attention to your website’s essential features, services, or products. It’s a powerful tool that can enhance user experience, improve visual appeal, and increase engagement on your site.
Icon boxes can effectively highlight different aspects with a combination of visuals and text for user engagement.
While there are numerous plugins available for creating icon boxes, not all of them are compatible with the Gutenberg block editor.
That’s why we’re offering an exclusive tutorial on ‘How to Create Icon Boxes in WordPress‘ from the ground up, to ensure you have the best tools at your disposal.
Here’s a step-by-step guide on how to create icon boxes in WordPress. We will cover everything from choosing the right plugin to designing and customizing your icon boxes. But before that, let’s learn some details about Icon Boxes.
What is Icon Box?
Icon boxes are web design elements commonly used on websites to visually represent different features, services, or categories concisely and attractively.
Each icon box typically includes an icon, a headline, and a short description. It often highlights features or services in a grid-like arrangement on a website.
What are the Benefits of Icon Boxes?
Icon boxes serve several purposes on a website:
- Visual Appeal: They add a visual element to the content, making a webpage more engaging and aesthetically pleasing.
- User Experience: Icon boxes can improve the user’s experience by providing information in small, easy-to-digest chunks.
- Highlighting Features: Icon boxes are often used to highlight a product or service’s essential features or benefits.
What are the Usage of Icon Boxes?
You’ll commonly find icon boxes used in the following areas:
- Homepages: To summarize and highlight critical services or features at a glance.
- Feature Pages: To list and explain different features of a product or service.
- Service Sections: To detail various services offered by a company or individual.
- Instructional Pages: To visually guide users through steps or actions.
How to Create Icon Boxes in WordPress
For today’s tutorial, we will use Ultimate Blocks. The reason of using Ultimate Blocks is that you can create Icon Boxes from Scratch and add any element you want to make your Icon boxes look amazing and eye-catchy.
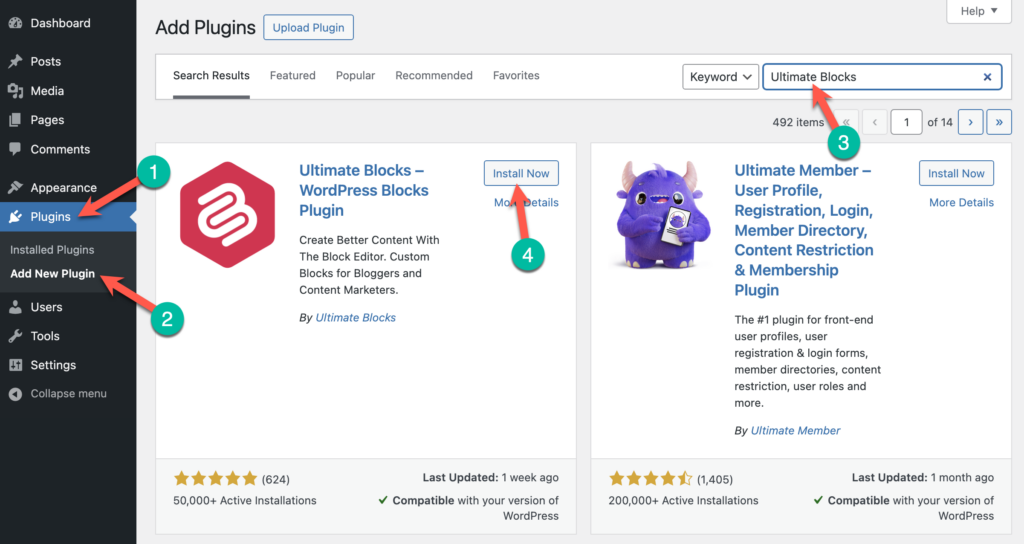
Step 1: Install Ultimate Blocks
To install Ultimate Blocks, go to your WordPress dashboard and select Plugins > Add New Plugin. In the search box, write Ultimate Blocks, and the plugin will appear. After that, install and activate the plugin.
Step 2: Insert Styled Box Block
Click on the ‘+‘ (1) button. Type Group inside the serach box (2). Select Group Block (3).

Select the group layouts and click “Add Block” button inside the Group Block. Search for the Column block and select the layout 33 /33/ 33 as shown below.

Now, select the firt column and click Add Block button. Type Styled Box and select the block. After that select the Bordered Box option.

Step 3: Create Your Custom Icon Boxes
First, type “/icon” inside the styled box. and select the icon. You can also upload your own custom SVG icons.

Now select the icon and press “Enter” key from your keyboard to insert other content block. (N.B. You must follor this step whenever you want to add new content block if the Add Block button does not appear.)

Click the Add Block button again to insert your desired content. In my case, I want to add Styled List block.

After, inserting your content, you must insert Spacer Block before and after your content blocks to adjust the space between content and overall look of your Icon Box. (N.B. You can also adjust margin and padding of your blocks if you dont want to add the spacer block.)

To create more boxes, you can copy the Styled Box block and paste it to the other columns. To past the Styled Box block, Press ‘CTRL’ + ‘V’ inside the other columns.

The final look is down below.

Final Thoughts
Hope, you’ve found this small tutorial easy to follow and helpful. Let me know your thoughts in the comment section below.
Don’t hesitate to ask any question If you’ve faced any issue creating Icon Boxes using the Ultimate Blocks. I would love to answer them.
Read More


Leave a Reply